Requirement:
To implement Google Cloud Messaging Service to your android Application you need to generate a SHA1 key, api project id and api key.To display the SHA-1 fingerprint for your certificate, first ensure that you have the certificate itself. You may have two certificates:
- Debug certificate: The Android SDK tools generate this certificate automatically when you do a "debug" build from the command line, or when you build and run a project from Eclipse without exporting it as a released application. The certificate is only for use with an application that you're testing; you can't publish an app that's signed with a debug certificate. The debug certificate is described in more detail in the section Signing in Debug Mode in the Android Developer Documentation. You can generate an API key from this certificate, but only use the key for testing, never for production.
- Release certificate: The Android SDK tools generate this certificate when you do a "release" build with either
antprogram or Eclipse. You can also generate this certificate using thekeytoolprogram. This certificate can be used with an app you release to the world. Once you have the correct certificate for your needs, you can display its SHA-1 fingerprint using thekeytoolprogram. - For more information about Keytool, see the documentation at http://docs.oracle.com/javase/6/docs/technotes/tools/windows/keytool.html.
Creating a Google API project
To create a Google API project:
- Open the Google APIs Console page.
- If you haven't created an API project yet, this page will prompt you to do so:
 Note: If you already have existing projects, the first page you see will be the Dashboard page. From there you can create a new project by opening the project drop-down menu (upper left corner) and choosingOther projects > Create.
 - Click Create project. Your browser URL will change to something like:
- Take note of the value after
#project:(4815162342 in this example). This is your project number, and it will be used later on as the GCM sender ID.
https://code.google.com/apis/console/#project:4815162342
Enabling the GCM Service
To enable the GCM service:
- In the main Google APIs Console page, select Services.
- Turn the Google Cloud Messaging toggle to ON.
- In the Terms of Service page, accept the terms.
Obtaining an API Key
To obtain an API key:
- In the main Google APIs Console page, select API Access. You will see a screen that resembles the following:
- Click Create new Server key. Either a server key or a browser key should work. The advantage to using a server key is that it allows you to whitelist IP addresses. The following screen appears:
- Click Create:


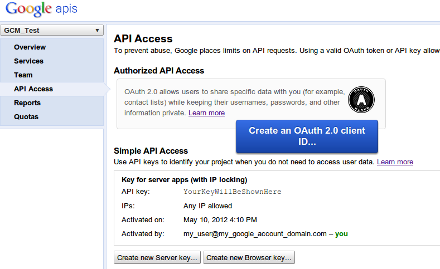
Take note of the API key value (
YourKeyWillBeShownHere) in this example, as it will be used later on.
Note: If you need to rotate the key, click Generate new key. A new key will be created while the old one will still be active for up to 24 hours. If you want to get rid of the old key immediately (for example, if you feel it was compromised), click Delete key.
Now make changes AndroidManifest.xml and add the following permissions and receiver
Permissions
<permission
android:name="com.example.myapp.permission.C2D_MESSAGE"
android:protectionLevel="signature" />
<uses-permission android:name="com.example.myapp.permission.C2D_MESSAGE" />
<uses-permission android:name="com.google.android.c2dm.permission.RECEIVE" />
<uses-permission android:name="android.permission.INTERNET" />
Note :- Replace com.example.myapp with your package name.
<application>
...
<receiver
</intent-filter>
</receiver>
android:name="com.example.myapp.MyBroadcastReceiver"
android:permission="com.google.android.c2dm.permission.SEND" >
<intent-filter>
<action android:name="com.google.android.c2dm.intent.RECEIVE" />
<action android:name="com.google.android.c2dm.intent.REGISTRATION" />
<category android:name="com.example.myapp" /></intent-filter>
</receiver>
</application>
Note :- Replace com.example.myapp with your package name.
Create a MyPrefs.java file for storing a device registration id.
public class MyPrefs {
private SharedPreferences sp;
private Editor editor;
public MyPrefs(Context context){
sp = PreferenceManager.getDefaultSharedPreferences(context);
editor = sp.edit();
}
public void putString(String key,String Value){
editor.putString(key,Value);
editor.commit();
}
public String getString(String key){
return sp.getString(key,null);
}
}
Now Create MyBroadcastReceiver.java in your main package
public class MyBroadcastReceiver extends BroadcastReceiver{
private static final String TAG = "GCM";
MyPrefs myPrefs ;
@Override
public void onReceive(Context context, Intent intent) {
myPrefs = new MyPrefs(context);
Log.d(TAG,"inside onReceive");
String action = intent.getAction();
if (action.equals("com.google.android.c2dm.intent.REGISTRATION")) {
handleRegistration(context,intent);
} else if (action.equals("com.google.android.c2dm.intent.RECEIVE")) {
handleMessage(context,intent);
}
}
private void handleRegistration(Context context,Intent intent) {
String registrationId = intent.getStringExtra("registration_id");
String error = intent.getStringExtra("error");
String unregistered = intent.getStringExtra("unregistered");
// registration succeeded
if (registrationId != null) {
Log.d(TAG, "Device_reg_id : "+registrationId);
// store registration ID on shared preferences
myPrefs.putString("DEVICE_REG_ID", registrationId);
// notify 3rd-party server about the registered ID
generateNotification(context, "Registration Sucessful", "Device register sucessfully!");
}
// unregistration succeeded
if (unregistered != null) {
// get old registration ID from shared preferences
// notify 3rd-party server about the unregistered ID
}
// last operation (registration or unregistration) returned an error;
if (error != null) {
if ("SERVICE_NOT_AVAILABLE".equals(error)) {
// optionally retry using exponential back-off
// (see Advanced Topics)
} else {
// Unrecoverable error, log it
Log.i(TAG, "Received error: " + error);
}
}
}
private void handleMessage(Context context, Intent intent) {
String data = intent.getExtras().getString("data");
generateNotification(context, "New Message is received", data);
}
private void generateNotification(Context context,String title,String text) {
NotificationCompat.Builder mBuilder =
new NotificationCompat.Builder(context)
.setSmallIcon(R.drawable.ic_launcher)
.setContentTitle(title)
.setContentText(text);
// Creates an explicit intent for an Activity in your app
Intent resultIntent = new Intent(context, MainActivity.class);
PendingIntent resultPendingIntent = PendingIntent.getBroadcast(context,0,resultIntent, 0);
mBuilder.setContentIntent(resultPendingIntent);
NotificationManager mNotificationManager =
(NotificationManager) context.getSystemService(Context.NOTIFICATION_SERVICE);
// mId allows you to update the notification later on.
mNotificationManager.notify(0, mBuilder.build());
}
}
Open MainActivity.java and replace with below code.
public class MainActivity extends Activity {
super.onCreate(savedInstanceState);
setContentView(R.layout.activity_main);
MyPrefs prefs = new MyPrefs(this);
device_reg_id = prefs.getString("DEVICE_REG_ID");
registrationIntent.putExtra("sender", "18501XXX2785"); // replace with your project id
startService(registrationIntent);
.timeToLive(3)
.delayWhileIdle(true)
.addData("data", "Welcome!")
.build();
Result result;
try {
result = sender.send(message, device_reg_id, 5);
} catch (IOException e) {
}
}
}
String device_reg_id;
@Override
public void onCreate(Bundle savedInstanceState) {super.onCreate(savedInstanceState);
setContentView(R.layout.activity_main);
device_reg_id = prefs.getString("DEVICE_REG_ID");
if (device_reg_id == null )
{
Log.d("GCM", "Registration start");
// registration
Intent registrationIntent = new Intent("com.google.android.c2dm.intent.REGISTER");
// sets the app name in the intent
registrationIntent.putExtra("app", PendingIntent.getBroadcast(this, 0, new Intent(), 0));registrationIntent.putExtra("sender", "18501XXX2785"); // replace with your project id
startService(registrationIntent);
}else
{
// send a message to device its self
String api_key = "AIzaSyBXSJHPqciXXXXXXXYeYdAoYfN1XXXXXXX"; // replace with your api key
Sender sender = new Sender(api_key);
Message message = new Message.Builder()
.collapseKey("1").timeToLive(3)
.delayWhileIdle(true)
.addData("data", "Welcome!")
.build();
try {
result = sender.send(message, device_reg_id, 5);
} catch (IOException e) {
e.printStackTrace();
} }
}
}
At the last add the gcm-server.jar to project
Open Android SDK Manager from Eclipse goto Window->Android SDK Manager and download Google Cloud Messaging for Android Library under Extras
After completion goto path
../sdk/extras/google/gcm/samples/gcm-demo-appengine/WebContent/WEB-INF/lib and copy gcm-server.jar file and paste in libs folder of your project

Now Run the Project
Note : - To use GCM on the Android emulator you also need to use a Google device with API 8 or higher and to register with a Google account on the emulator via the Settings.
Download Source Code

GCMTest.zip
Note : - To use GCM on the Android emulator you also need to use a Google device with API 8 or higher and to register with a Google account on the emulator via the Settings.
Download Source Code
GCMTest.zip
Hi Kirit
ReplyDeleteI was wondering if you are interested in doing a small partnership to promote the SSAC (Samsung Smart App Challenge. We are looking for people in Stackoverflow...especially Android App Developers to spread the word about the contest. Since you are active on Stack...we were wondering if you would be interested in making some cash by asking some questions on Stack. How many and for how much? We can talk more via email. If you are interested please let me know. Thanks!
John
john@fllu.com
Thanks for kind of information,its very useful for me.
ReplyDeleteThe way you explained the gcm for android is simply superb...
ReplyDeleteApart from that you can check android interview questions @ http://skillgun.com